How to Make a Sprite Sheet: A Step-by-Step Guide
Learn how to make a sprite sheet with the Forest Ranger walk cycle: six 64 × 64 frames, a 394 × 64 PNG, and the JSON coordinates that describe it. Follow the actual screenshots, check the layout arithmetic, then choose the import workflow for your game engine.
Open the sprite sheet maker



6 frames · 64 × 64 px · 8 FPS
| Example input | Six Forest Ranger PNG frames |
|---|---|
| Frame size | 64 × 64 px each |
| Layout | 6 columns × 1 row, in filename order |
| Outer padding | 0 px |
| Frame spacing | 2 px |
| Finished size | 394 × 64 px: 6 × 64 + 5 × 2 |
| Downloads | Source frames ZIP, finished PNG and matching JSON atlas |
| Engine setup | Phaser atlas loading; Unity and Godot PNG slicing; JSON is not a universal importer |
How to check that your artwork stays local
- Open your browser’s Network panel and clear its request list after the page loads.
- Choose a non-sensitive test image or GIF in the matching tool, change the layout, and export it.
- Inspect any new requests: selected artwork should not be sent in a request body. Page assets and consented analytics are separate from artwork processing.
This is a check you can repeat, not an independent security audit or a promise of offline availability. Save your exports before leaving the page.
What Is a Sprite Sheet?
A sprite sheet is a single image containing several smaller images called sprites. For an animation, those images are successive poses of the same character or object. The game draws one rectangle at a time rather than displaying the entire sheet. The file is a container for artwork; it does not, by itself, decide how fast the character moves or when an animation starts.
This guide uses six 64 × 64 Forest Ranger walking frames throughout. We will arrange them in one row, leave a two-pixel gap between neighbors, and export a 394 × 64 sheet. The screenshots, downloadable files, and coordinate example all use that same arrangement, so you can check each result against your own work.
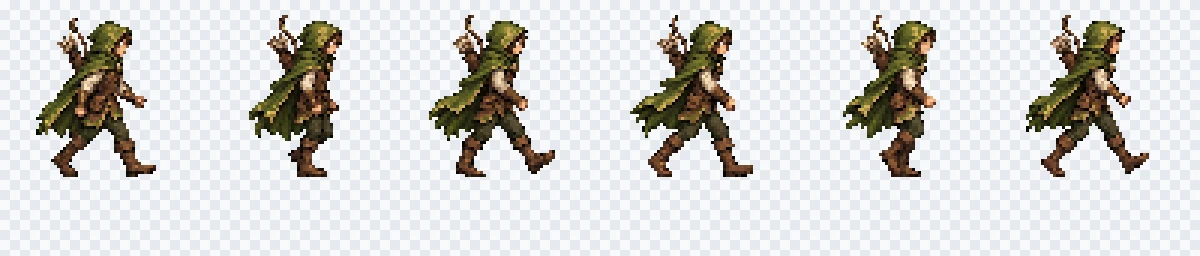
Sprite Sheet vs Individual Image Files
Separate images are perfectly reasonable for a few static objects. A sheet becomes useful when you want a related collection to travel together, share one texture, and keep a predictable frame order. It can reduce separate file requests, but it is not a guarantee of faster rendering. Texture size, batching, engine settings, and the rest of your scene still matter.
For animation, keep a common canvas around every pose. A character can lean or lift a foot inside that canvas without changing the cell size. Cropping every pose tightly may save space, but it also changes the origin unless your importer tracks trimming offsets.
What a JSON Atlas Contains
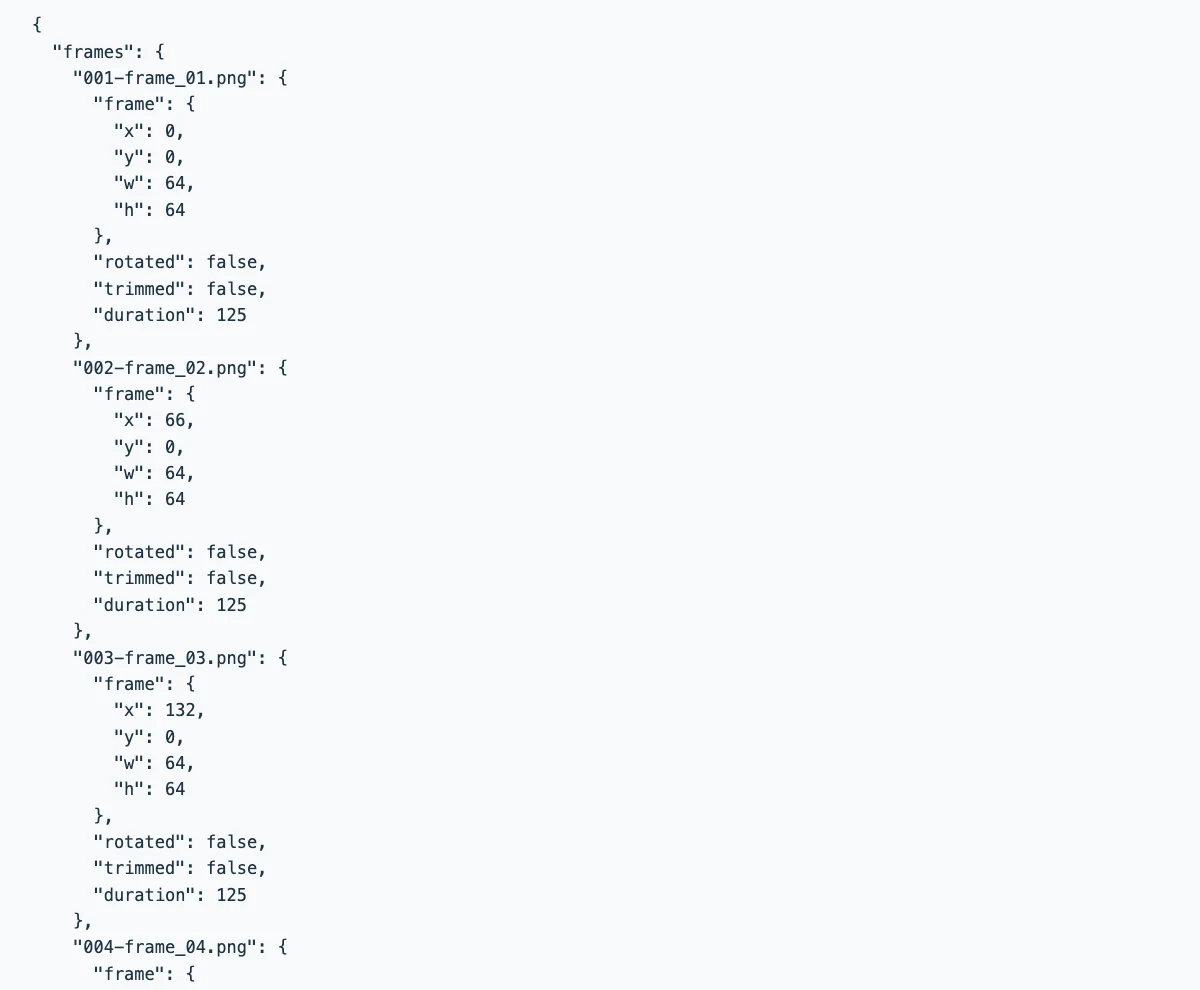
An atlas is the map beside the image. Each named entry records a rectangle: x and y locate its top-left corner, while w and h describe its size in pixels. Our first frame starts at x = 0; the second starts at x = 66 because its neighbor occupies 64 pixels and the gap occupies two. The image and its map must be exported together whenever the layout changes.
"001-frame_01.png": {
  "frame": { "x": 0, "y": 0, "w": 64, "h": 64 },
  "rotated": false,
  "trimmed": false,
  "duration": 125
}
Before You Start: Prepare Your Frames
Prepare a short sequence before thinking about the final sheet dimensions. In your drawing program, put every pose on the same 64 × 64 canvas. Keep the character’s feet or another useful anchor at a consistent location. Extra transparent space is usually easier to manage than a different canvas for every frame. The arrangement tool preserves your pixels; it cannot repair a pose that was drawn at the wrong scale.
Name the six files frame_01.png through frame_06.png. Leading zeroes make the intended order clear in file browsers and code. PNG is a convenient working format because it preserves alpha and does not introduce lossy compression around pixel edges. WebP can also contain transparency. JPG has no alpha channel, so a white background in a JPG will remain part of its artwork.
Keep a copy of the source drawings. An exported sheet is useful for the game, but individual editable frames are easier to revise. The current tool accepts up to 256 images, 20 MB per image, and 64 MB per selection. It also checks a 32-million-pixel source budget. Start with the small downloadable example, then use your own sequence once the workflow feels familiar.
How to Make a Sprite Sheet, Step by Step
Here is how to make a sprite sheet from the six prepared frames. Open the tool in another tab if you want to keep these instructions visible. The example uses an eight-frame-per-second preview, six columns, zero padding, and two pixels of spacing. Follow the four steps in order before changing those values for your own project.
Step 1: Open Your Frames
Extract the sample ZIP first, then select its six PNG files in the Frames input. You should see six thumbnails and six frames in the workspace. Their natural filename order puts frame_01 before frame_02. Check the first and last poses rather than assuming the file picker preserved the order you clicked them.
At this point, the preview may use the default four-column layout. That is expected: loading files and choosing the final layout are separate actions. All six original images are still present. The next step changes where they appear in the combined image, not the content inside each pose.
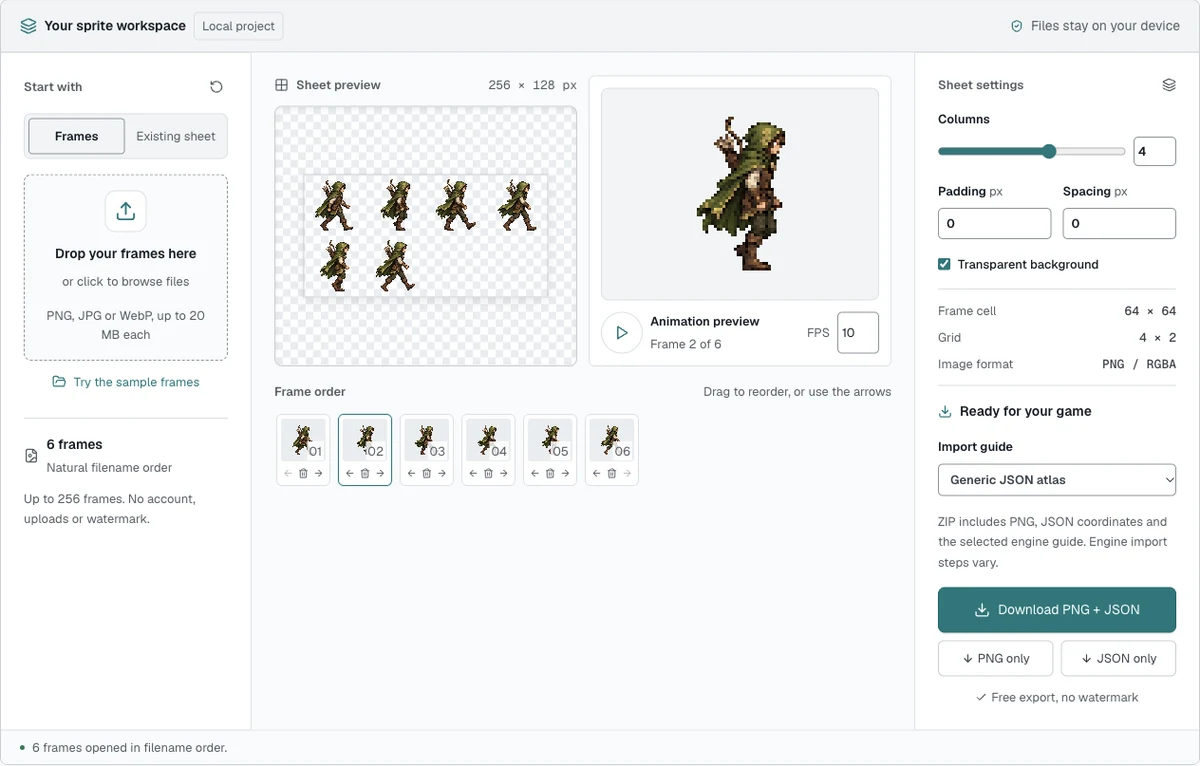
Step 2: Set Columns, Order, Padding and Spacing
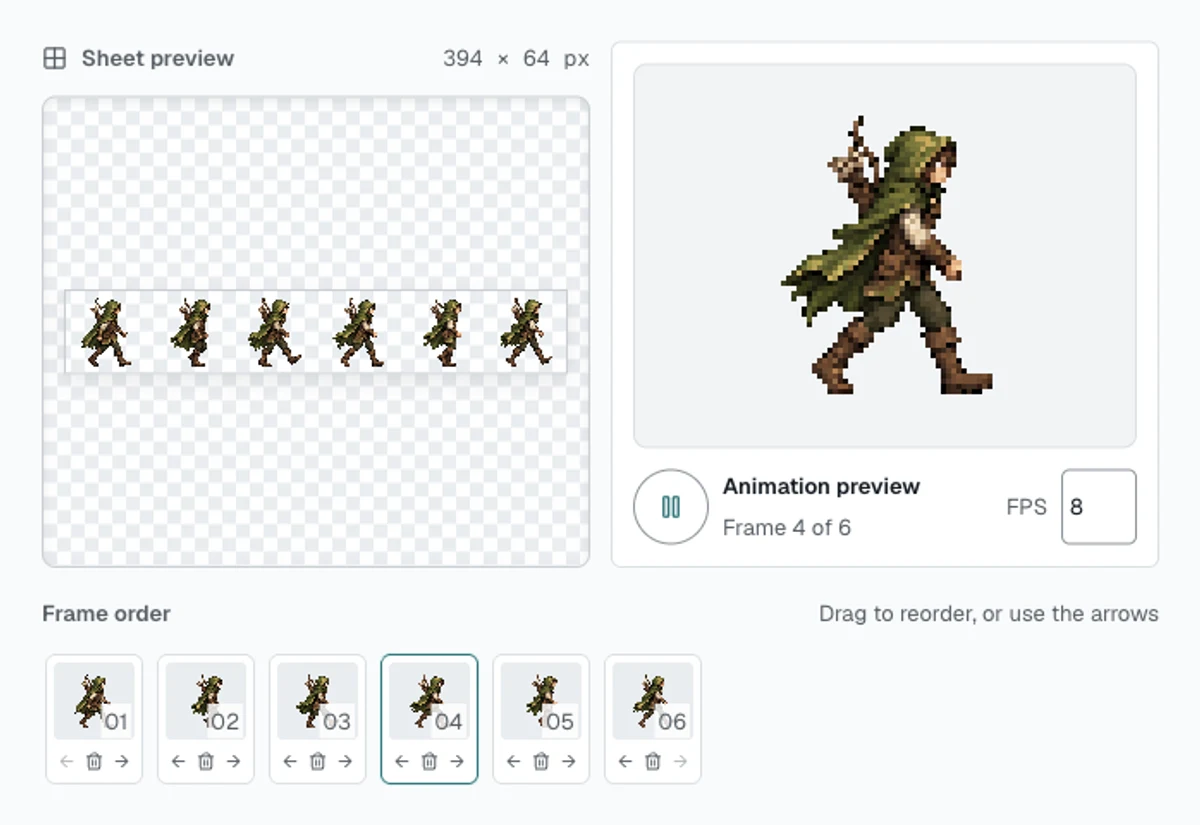
Set Columns to 6, Padding to 0, and Spacing to 2. All six poses should now appear in one horizontal row. The sheet dimensions should read 394 × 64. If they do not, inspect the input dimensions and settings before continuing. A single 65-pixel-wide source frame changes the common cell width and therefore the entire output calculation.
Use the thumbnail arrows or drag a frame to change its position. For this example, leave the numbered poses in their original sequence. The tool reads left to right, then top to bottom. Spacing is the distance between neighboring cells; padding is the border outside the complete sheet. They are different settings and should not be substituted for each other when configuring an importer.
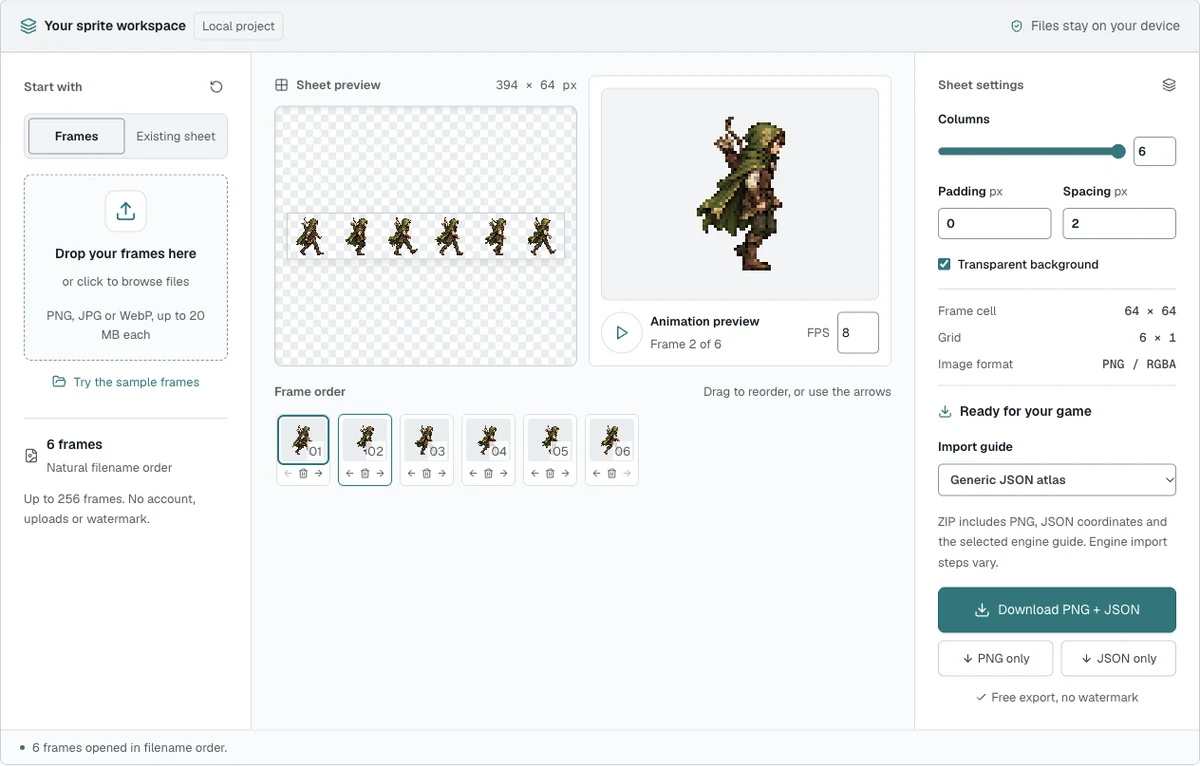
Step 3: Preview the Animation
Play the animation at 8 FPS and watch several loops. Look for a foot sliding sideways, an accidental duplicate, a missing pose, or a jump between the final and first frames. Pause and choose individual thumbnails when you need to inspect a transition. A consistent origin often matters more than adding more poses.
The preview changes which existing frame is shown. It does not alter the drawing or add intermediate motion. Changing FPS affects perceived speed, not pose quality. When the loop looks right, keep the same rate in your game’s animation settings; importing a PNG alone does not communicate that speed.
Step 4: Export the PNG and the JSON
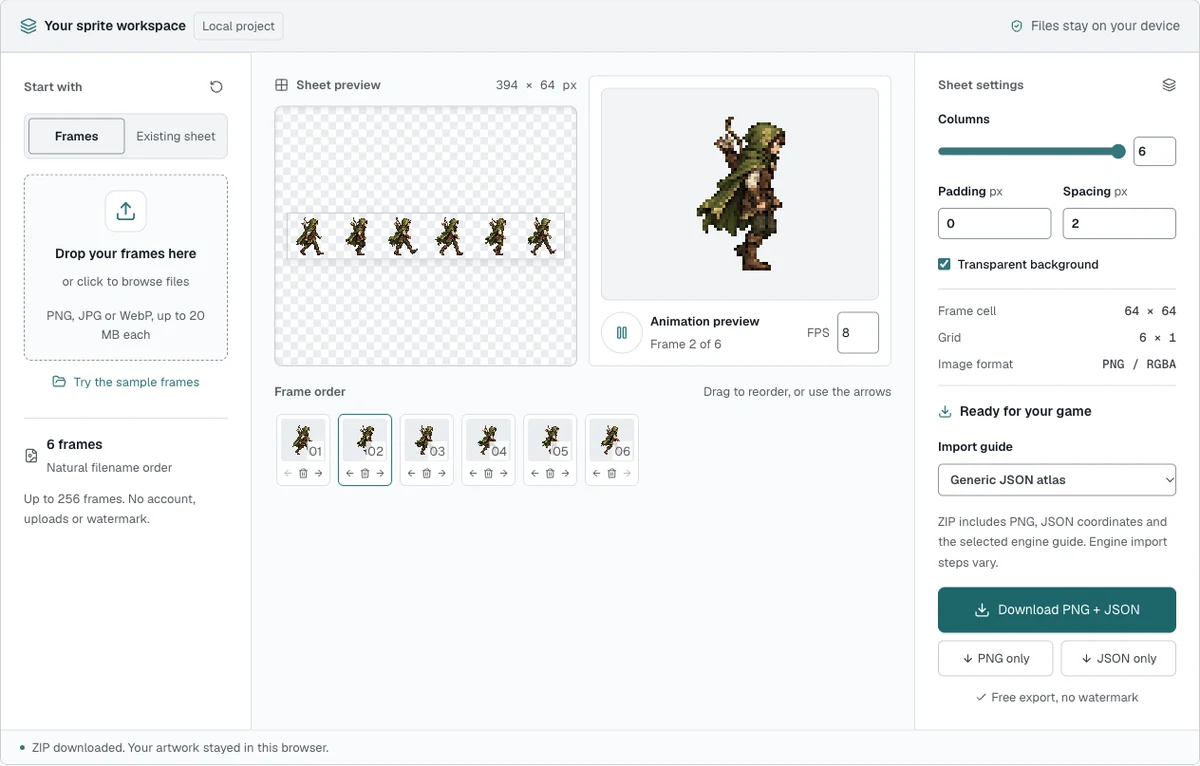
Keep Transparent background enabled, then download the PNG and JSON together using the ZIP button. The current filenames are sheet.png and atlas.json. The ZIP also includes the selected import guide. You can use the separate PNG only and JSON only buttons, but save both from the same layout to avoid mismatched coordinates.
Open the downloaded image and confirm its dimensions are 394 × 64. Keep the JSON beside it, even if your current engine uses manual slicing. Downloading is also your save step: the workspace is held in this browser tab rather than a cloud project. Refreshing the page does not restore your previous selection.
Choosing Frame Size, Columns and Spacing
For a regular sheet, width equals cell width × columns, plus spacing × (columns − 1), plus padding × 2. Height uses cell height and the number of rows in the same formula. Our example is 64 × 6 + 2 × 5 + 0 × 2 = 394 pixels wide. There is one 64-pixel row, so the height is 64. The frame origins are x = 0, 66, 132, 198, 264, and 330, all at y = 0.
Changing to three columns makes two rows. With the same two-pixel spacing and zero padding, the result becomes 196 × 130. The artwork has not become larger or smaller; only its arrangement has changed. If the last row is incomplete, the remaining cells are transparent, and the atlas lists only actual frames. Your animation should follow those named entries instead of treating every possible grid cell as a pose.
Choose frame dimensions for the artwork and target display size, then choose a sheet layout that fits your engine’s texture limits. A power-of-two size is not a universal requirement. Platform restrictions, compression settings, and memory budgets vary. The workbench limits each axis to 8192 pixels and the output to 32 million pixels; a layout can exceed that pixel budget even when neither side reaches the axis limit.
A small gap can help keep neighboring artwork apart, but spacing alone does not solve every texture-bleeding problem. Filtering, mipmaps, transparent edge colors, and edge extrusion also affect sampling. For crisp pixel art, inspect point or nearest filtering and integer display scales in your engine. Test the asset at its real in-game size before committing to a large batch of exports.
How to Import a Sprite Sheet Into Your Engine
The PNG is shared across these workflows, but importers are not interchangeable. Phaser can read the included JSON atlas. The other engines need their own sprite regions or strip settings. Menu names can vary between releases, so use the official references below alongside your installed editor.
Unity: Sprite Editor and Sprite Atlas
Import sheet.png as Sprite (2D and UI), choose Multiple for Sprite Mode, and open Sprite Editor. Use Grid by Cell Size with 64 × 64 cells. Match the outer offset to zero and the space between cells to two pixels. Inspect the six rectangles before applying them, then put the resulting sprites into playback order in an animation clip. Keep a consistent pivot and choose Pixels Per Unit for your scene.
Sprite Editor slicing and Sprite Atlas are separate operations. Slicing defines the source regions; a Sprite Atlas can later pack sprites for runtime use. You do not need to create an atlas asset merely to animate this example. For pixel art, review filtering and compression rather than assuming an editor preview matches the final game.
Godot: AnimatedSprite2D and SpriteFrames
Create an AnimatedSprite2D and a SpriteFrames resource. Godot’s sheet selector is convenient for an evenly divided image without gaps. Our 394-pixel example includes two-pixel separators, so dividing its width into six equal pieces would include the wrong pixels. Use six AtlasTexture regions instead: each is 64 × 64 at the x positions listed above, with y set to zero.
Alternatively, re-export the same six frames with zero spacing and padding. That produces a 384 × 64 image which can be divided into six columns and one row. Add the poses in order and set the animation speed to 8 FPS. Those are two different valid imports; do not mix the gap-free grid counts with the spaced source image.
GameMaker: Import as a Sprite and Set the Grid
Create a Sprite asset and use Import Strip or the image editor’s Convert to Frames workflow. For the spaced example, choose 64 × 64 cells, six frames, zero outer offset, and two pixels of horizontal separation. Check the extracted subimages before confirming, then keep the same origin across them and set a suitable animation speed.
GameMaker’s filename shortcut expects a continuous horizontal strip. To use it, first re-export with zero spacing and padding, giving a 384 × 64 image, then name it character_strip6.png. Renaming the 394-pixel spaced sheet to that filename is insufficient: the shortcut would divide the gaps into the frames. The JSON is a useful coordinate reference here, not an editor import plugin.
Phaser: Load the JSON Atlas
Place the matching PNG and JSON in your game’s asset folder and load them with this.load.atlas. The JSON already describes the two-pixel gaps, so you do not need to reconstruct a regular-grid stride. Create an animation with the exported names in order. The example below shows scene methods to adapt inside your Phaser project; it is not a complete game or an editor plugin.
The selected preview speed is 8 FPS, which corresponds to 125 milliseconds per frame. Configure that rate explicitly. If you later use variable GIF frame delays, read and apply those durations rather than assuming one fixed rate will reproduce the timing. Re-export the image and JSON together whenever the layout changes.
preload() {
  this.load.atlas("ranger", "/assets/sheet.png", "/assets/atlas.json");
}

create() {
  const names = [1, 2, 3, 4, 5, 6].map((n) =>
    `${String(n).padStart(3, "0")}-frame_${String(n).padStart(2, "0")}.png`
  );
  this.anims.create({
    key: "walk",
    frames: names.map((frame) => ({ key: "ranger", frame })),
    frameRate: 8,
    repeat: -1
  });
  this.add.sprite(160, 120, "ranger", names[0]).play("walk");
}Common Mistakes When Building a Sprite Sheet
Different canvas sizes can make a character wobble even when every pose looks fine alone. Keep the same cell and anchor, or account for trimming offsets in the importer. A tightly cropped foot is not the same origin as a foot surrounded by transparent space.
Do not confuse spacing with protection against every filtering artifact. Zero spacing can expose neighboring colors, but adding a gap may still require correct filtering, extrusion, or mipmap settings. Likewise, scaling the whole sheet to fit a convenient size changes every coordinate. Rearrange cells instead, and use integer scales when displaying pixel art.
Check that transparency survived your intermediate files. A checkerboard inside a screenshot is not an alpha channel, and saving a working frame as JPG can add opaque pixels and compression artifacts. Use the source PNGs rather than screenshots of the artwork.
Finally, distinguish frame names from numeric indexes. This example’s names begin with 001, while an engine array may start at index zero. Use the exact exported names. If you change the column count or gaps, discard the old coordinate file and export a fresh matching pair. An old JSON beside a new PNG is a common cause of apparently random crops.
Sprite Sheet FAQ
What is a sprite sheet?
It is one image containing several smaller sprites or animation poses. The game draws selected regions from it. Animation order and timing are configured separately, sometimes with help from an atlas file.
Do I need a sprite sheet or single image files?
Either can work. A few static images may be simpler as separate files. A related animation often benefits from a shared texture and explicit regions. Measure your own project rather than assuming a sheet always improves performance.
Do all frames have to be the same size?
Uniform canvases make a regular grid and stable animation origins easier. The tool can center smaller images inside a common cell, but it cannot infer the right character anchor. Prepare consistent source cells whenever possible.
How much padding and spacing should I use?
Choose values your importer can represent. This example uses zero padding and two-pixel spacing. Gaps alone do not guarantee clean sampling; test your engine’s filtering, mipmaps, and any extrusion settings at the actual display size.
What is the JSON file for?
It maps frame names to pixel rectangles in the PNG. Phaser can load this atlas format. Other workflows may use it as a reference while you define regions manually. The JSON and image must describe the same export.
Are my images uploaded anywhere?
No. The workbench reads your selected files and exports them in your browser. It does not send the source artwork to an image service or save a cloud project. Download your result before refreshing or closing the tab.
Can this make a new animation for me?
No. It arranges poses you already have and previews their sequence. It does not generate new frames, add in-between drawings, or invent a character’s movement. Missing poses need to be created in your drawing workflow.
Can I use the exported sheet commercially?
That depends on the rights attached to your source artwork. Rearranging images does not grant a new license or change ownership. Check third-party asset permissions, including attribution and commercial-use conditions, before using them in a released game.
How many frames or how large can a sheet be?
The current limits are 256 frames, 20 MB per input image, 64 MB per selection, and a 32-million-pixel source budget. Output is limited to 8192 pixels per axis and 32 million pixels overall. Over-limit settings show an error.
What if I already have a sprite sheet and want single frames?
Use the related extraction tool to download individual PNGs or a frame ZIP. This tutorial explains combining frames into one image; choose the reverse workflow when your goal is separate files.
Split an existing sprite sheet into frames